Let's Use a Custom SSL Certificate for Tomato Router

Hello ![]()
Recently, I’ve upgraded the firmware on one of my routers which has the Tomato firmware installed (FreshTomato mod).
And after setting it up, I’ve returned to the idea of using the custom SSL certificate for its admin web UI. Why? Because I can create a custom (self-signed and trusted) certificate authority, make it trusted by my machines, and then install the certificate issued by that CA on the router ultimately having its web UI better trusted (because once in a while it might so happen that malicious 3rd party may hack the router, swap the certificate and reduce the security of the system).
Another reason for me thinking about this is the following: previously (when I was using the previous version of the firmware) I’ve been using the provided SSL certs by Tomato and restricted web UI to support HTTPS only. But some time later it turned out that the certificate expired, and all the browsers were rejecting communication with the website because of that. Effectively, I became blocked and couldn’t access the admin web UI anymore at that time ![]() . And I had to re-flash the firmware to get the access back
. And I had to re-flash the firmware to get the access back ![]() .
.
Is it possible at all to use a custom cert? Maybe, the certificate is built into the firmware? Let’s check!
Note: In this post, my journey describes the behavior of FreshTomato Version 2024.2 MIPS (the most recent at the moment of writing)
If we enable HTTPS for admin UI at say 1 pm and check the HTTPS endpoint, we’ll get back the expected browser warning about the cert, which after bypassing lets us in into the web UI. And the certificate info shows that it was auto-generated by the router at 1 pm. If we reboot the router at 2 pm, we’ll observe that this time the certificate has been issued at 2 pm. Alright: so it has been regenerated on each boot.
Later I found out that it’s possible to not regenerate the certificate on each boot and instead re-use the previously auto-generated certificate.
I don’t remember exactly the settings that I used with the previous version of the firmware but it looks like previously that was the root cause of my issue: I enabled HTTPS, the router generated a certificate, and after some time (without proper understanding the possible implications) I enabled re-usage of the certificate, and since it wasn’t regenerated and had some expiration threshold it was only a matter of time when it would expire (and lock me out
)
It took several days for me to try out the possible next steps that might lead to success, and fail on them until I finally stopped at the following ones.
Note: I’ve investigated the auto-generated certificates and did my best to replicate them by using the same encryption type, hash size, and additional info like DNS names in order to have better confidence that the router’s software would not fail on my cert (let’s not forget that the firmware size is limited and much of the software present on the router is custom built and do not support all the possible options/formats as you may expect on your Linux distro).
0)  Out of Curiosity Investigation (Optional)
Let’s take a look at the currently mounted file systems:
mount
Output:
rootfs on / type rootfs (rw)
/dev/root on / type squashfs (ro)
proc on /proc type proc (rw)
tmpfs on /tmp type tmpfs (rw)
devfs on /dev type tmpfs (rw,noatime)
sysfs on /sys type sysfs (rw)
devpts on /dev/pts type devpts (rw)
Let’s try to locate the auto-generated certificate:
find / -iname *.crt
find / -iname *.pem
find / -iname *.key
find / -iname *cert*
find / -iname *ssl*
ls -la /etc/*.pem
Output:
find / -iname *.crt
/rom/etc/ssl/certs/ca-certificates.crt

find / -iname *.pem
/rom/etc/ssl/cert.pem
/tmp/etc/cert.pem
/tmp/etc/key.pem
/tmp/etc/server.pem

find / -iname *.key

find / -iname *cert*
/rom/etc/l7-protocols/validcertssl.pat
/rom/etc/ssl/cert.pem
/rom/etc/ssl/certs
/rom/etc/ssl/certs/ca-certificates.crt
/tmp/etc/cert.pem
/usr/sbin/gencert.sh

find / -iname *ssl*
/rom/etc/l7-protocols/ssl.pat
/rom/etc/l7-protocols/validcertssl.pat
/rom/etc/ssl
/rom/etc/ssl/openssl.cnf
/tmp/etc/ssl
/usr/lib/libmssl.so
/usr/lib/libssl.so
/usr/lib/libssl.so.1.1
/usr/sbin/openssl
/usr/sbin/openssl11

ls -la /etc/*.pem
-rw-r--r--    1 root     root          1391 Jul 22 10:46 /etc/cert.pem
-rw-r-----    1 root     root           302 Jul 22 10:46 /etc/key.pem
-rw-r--r--    1 root     root          1693 Jan  1  1970 /etc/server.pem
Let’s see the properties of the auto-generated certificate:
openssl x509 -noout -text -in /etc/cert.pem
Certificate:
    Data:
        Version: 3 (0x2)
        Serial Number:
            6c:9c:0d:f8:bb:18:2a:11
        Signature Algorithm: ecdsa-with-SHA256
        Issuer: emailAddress = root@localhost, C = US, ST = Ohio, L = Columbus, CN = 192.168.1.1, O = FreshTomato, OU = FreshTomato Team, emailAddress = root@localhost
        Validity
            Not Before: Jul 22 08:03:06 2024 GMT
            Not After : Jul 23 08:03:06 2034 GMT
        Subject: emailAddress = root@localhost, C = US, ST = Ohio, L = Columbus, CN = 192.168.1.1, O = FreshTomato, OU = FreshTomato Team, emailAddress = root@localhost
        Subject Public Key Info:
            Public Key Algorithm: id-ecPublicKey
                Public-Key: (256 bit)
                pub:
                    04:f6:4f:45:82:e5:2f:db:58:13:9c:36:85:8e:26:
                    af:03:83:fb:43:3b:d1:73:fc:63:8b:31:24:ff:83:
                    a4:ef:4b:85:19:1a:6c:3b:fb:b8:78:c3:d6:20:61:
                    6e:84:f7:78:99:1c:5d:b0:d0:dd:18:b9:93:bd:af:
                    c1:9c:1a:54:f9
                ASN1 OID: prime256v1
                NIST CURVE: P-256
        X509v3 extensions:
            X509v3 Key Usage:
                Digital Signature, Non Repudiation, Key Encipherment, Data Encipherment
            X509v3 Subject Alternative Name:
                IP Address:192.168.1.1, DNS:192.168.1.1, DNS:HelloWorld, DNS:helloworld
            X509v3 Extended Key Usage:
                TLS Web Server Authentication
            X509v3 Subject Key Identifier:
                A0:94:63:C5:6B:A9:44:FB:DC:6F:95:CD:4C:68:37:EB:7A:D8:AE:68
            X509v3 Authority Key Identifier:
                keyid:A0:94:63:C5:6B:A9:44:FB:DC:6F:95:CD:4C:68:37:EB:7A:D8:AE:68
                DirName:/emailAddress=root@localhost/C=US/ST=Ohio/L=Columbus/CN=192.168.1.1/O=FreshTomato/OU=FreshTomato Team/emailAddress=root@localhost
                serial:6C:9C:0D:F8:BB:18:2A:11

            X509v3 Basic Constraints:
                CA:TRUE
    Signature Algorithm: ecdsa-with-SHA256
         30:45:02:21:00:f8:db:ee:4e:43:ff:09:c0:fc:60:94:1c:9c:
         49:e9:bd:2b:c7:2e:fe:c4:ea:d1:ff:b4:36:f0:ee:f1:25:f9:
         3b:02:20:39:cf:84:df:db:0c:83:25:16:18:c8:bb:ad:6a:f2:
         12:4d:9d:6e:8d:06:3c:44:bd:92:11:a2:ac:80:b0:74:df
It matches the certificate information we can see in the browser when accessing the HTTPS web UI, so:
-
/etc/cert.pemis the certificate for web UI -
/etc/key.pemis the private key for this certificate -
/etc/server.pemis the CA used to sign this certificate
Ideally, as I try to create a certificate with similar properties I’ll also generate the one with SHA256 hashing for signature (Signature Algorithm: ecdsa-with-SHA256). The smaller the signature the smaller the size, and in this case size matters since we’ll be storing data in NVRAM.
The built-in router’s web server is some custom build of the httpd, and it uses /etc/cert.pem and /etc/key.pem files for its SSL endpoint. Obviously, the first and most basic thing that came to my mind for testing the idea of a custom certificate was the following: generate a custom cert, replace the above-mentioned files in the router, and check in the browser (ensuring that the permissions for these new files would match the ones for auto-generated ones via the chmod and chown commands).
The fresh instance of the browser was able to open the HTTPS endpoint after this change, however, the provided certificate was the old one (auto-generated).
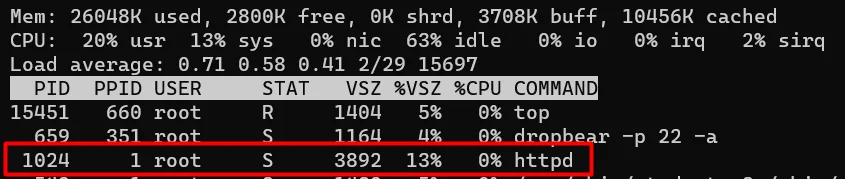
Look like the web server caches this info. Alright, then I got the PID and command line of the httpd via the top command, killed it kill -9 <HTTPD_PID>, and restarted the web server with the same command line (which happens to not have any args: just httpd).

After the server restart, the browser was given the correct certificate (created by me):
But after I accepted in the browser this untrusted cert, I got back an error:
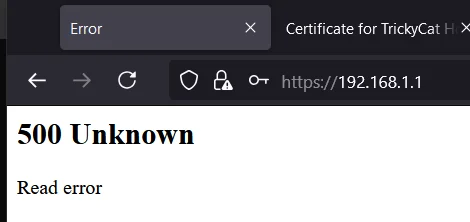
And here is the error in the router’s command line:

I’ve also looked through system logs, but there was nothing useful. And googling this error didn’t help much (at least in the case of this tiny custom build of the httpd).
So, it was not that easy. And I was thinking that it would be a (very) long journey to somehow use my own certificate (perhaps, requiring making a custom build of the firmware).
Luckily, I found a way ![]()
If we have HTTPS web UI enabled and also enabled the option for Save In NVRAM then the auto-generated certificate persists across reboots (instead of being re-generated upon each boot/start of the web server). This is a clue that it might be useful to take a look at NVRAM.
nvram show | less
We can see the HTTPS-related settings:
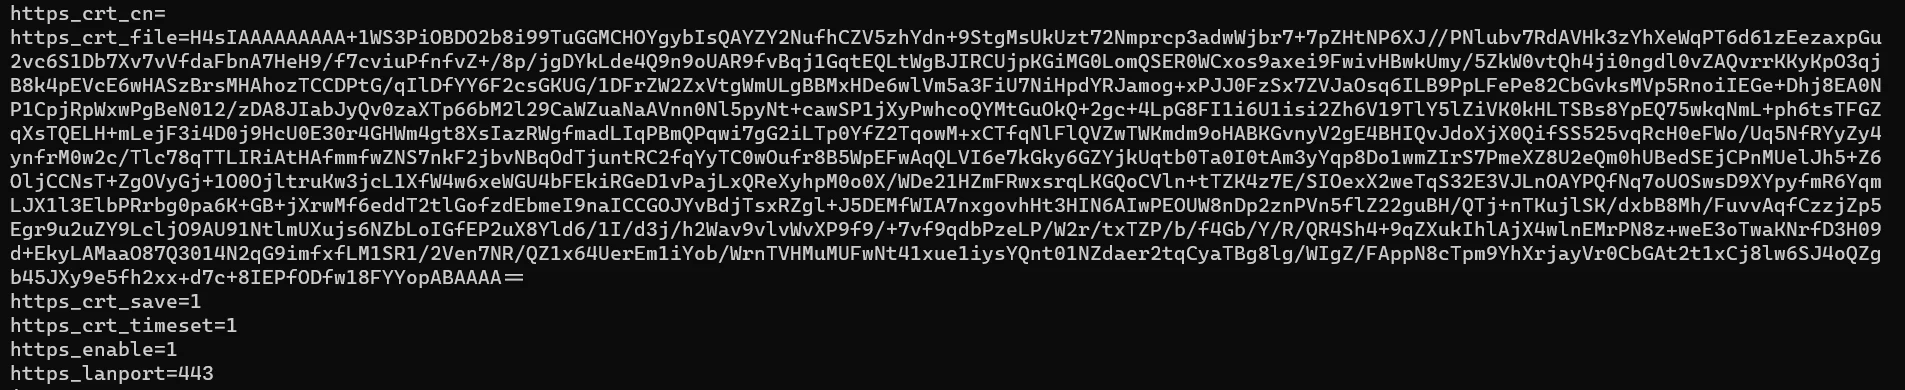
The value of the https_crt_file looks like a base64 encoded value. Based on the name of the variable, it’s some file. What’s inside?
Let’s decode this value (it’s not that easy since the router does not have the base64 command):
mkdir /tmp/test
cd /tmp/test

nvram get https_crt_file > nvram_file.base64
openssl enc -base64 -v -d -in nvram_file.base64 -out nvram_file -A
But what does it represent: a certificate, a key, or some combination of both?
cat nvram_file
Output:
�VKs�8�ٿ"���c� ɲ,@ccn~�W��a���+`2�$S;{�٩��wi������Y�O�r��e���E�M�b�Z����G�k␦F�k��-Co����_u�[��x�/��ߝ����)�8bB�{�=��_�␦��j��ZI!�������.��HDtX,h�ֱz/E�+� �/�fE���!�8��e��@B��(�����$�pN���
h�0�
��r6ߜk��5�\�����<�t4��Ih�*����K���`�␦�,1ZyFz" A��8c�@44�B�4i[���]��0<$��'$/�6�N��lͥ�КY��5��}
�k����ϸ.���b�Mb�-���u�9X�VbT�$����D;� *6b����1Ff��M
�z1w�����SA7Ҿi������Eh��K"�����.��N�}����
��~�eTg�*gf������%v�N�/%��}���no���V��*���c&r�)߬�0��ӕ���4�!��p�g�dԻ�Av�����N;���~�2L-0:���V�Ap�
T���A�ˡ�b9���M��&�&*���� �"��>g�g�6y ��@^u!��Q�I�����#lO�`9\���N��嶻��x�/U�[�:��S��H������/y|���(���G
l���
VY��6J�>��"{����K}��RK��=ͫ�9,,�ا'�G�*��W�]ĕ�ѭ�4����`~�z�1��u���Q�7Dng��v!�%��v4��`��y
�0<C�[�çl�=Y�~Vv� CX�;�(���r
�����*��H��Ű|2ź�����6i�H+��e�KrX��=��e�E�e�� g�?k��]��H�����j�o���\�_�����ju��x��[j���?��������xJ>��W�B!�� g��7����7�<␦(��q��߄�"�1���7�ڡ��g�|�5I�W���A�q��I���j�MQ̸���x��,�a ��SYu���ڂɤ���`�b g�@��|q:f��W�6�V�l`-��q
?%���9%|�{���~w�>�|���_a�)
After searching and walking inside the try-and-fail loop, I figured it out: that’s a gzipped archive with the certificate and key (both placed inside the etc directory in the archive):
tar -tvzf nvram_file
Output:
-rw-r--r-- 0/0      1391 2024-07-22 12:23:06 etc/cert.pem
-rw-r----- 0/0       302 2024-07-22 12:23:05 etc/key.pem
If we extract and check the certificate, we’ll see that it’s the one being used by the web server.
So, here’s the idea:
- place our custom certificate with its key in the
etcfolder in some temporary location - gzip this
etcfolder - store base64 encoded value for this archive under the
https_crt_filekey in NVRAM - reboot the router
1) Create a Private Certificate Authority (CA)
This would give us a CA certificate valid for 11000 days:
openssl ecparam -genkey -name prime256v1 -out ca.key

cat > ca.config <<EOF
[req]
distinguished_name = req_distinguished_name
prompt = no

[ ext ]
basicConstraints=CA:TRUE,pathlen:0

[req_distinguished_name]
countryName = UA
stateOrProvinceName = Kyiv
localityName = Kyiv
organizationName = TrickyCat
commonName = TrickyCat Router CA for Blog Post
EOF

openssl req -x509 -new -SHA256 -nodes -key ca.key -days 11000 -out ca.crt -config ca.config -extensions ext
Let’s check it:
openssl x509 -noout -text -in ca.crt
Certificate:
    Data:
        Version: 3 (0x2)
        Serial Number:
            58:14:bc:95:be:b9:3a:bc:cb:f5:40:54:ae:8e:f0:87:3c:02:56:62
        Signature Algorithm: ecdsa-with-SHA256
        Issuer: C = UA, ST = Kyiv, L = Kyiv, O = TrickyCat, CN = TrickyCat Router CA for Blog Post
        Validity
            Not Before: Jul 22 11:01:11 2024 GMT
            Not After : Sep  3 11:01:11 2054 GMT
        Subject: C = UA, ST = Kyiv, L = Kyiv, O = TrickyCat, CN = TrickyCat Router CA for Blog Post
        Subject Public Key Info:
            Public Key Algorithm: id-ecPublicKey
                Public-Key: (256 bit)
                pub:
                    04:b6:af:0f:09:9e:ec:98:6a:cc:7d:0c:f6:1c:b1:
                    de:8d:e8:ad:c6:32:41:26:fa:90:0f:90:43:4f:04:
                    5b:e6:8c:52:89:e1:68:ad:84:24:08:70:cf:34:fe:
                    27:7f:fe:78:9f:2f:77:0c:93:bb:2c:1e:af:17:02:
                    c4:43:49:8d:0c
                ASN1 OID: prime256v1
                NIST CURVE: P-256
        X509v3 extensions:
            X509v3 Basic Constraints:
                CA:TRUE, pathlen:0
    Signature Algorithm: ecdsa-with-SHA256
         30:44:02:20:60:4b:27:bf:54:a4:30:18:46:8f:6d:38:40:fc:
         ae:7d:18:f0:5f:9c:d6:a9:53:f8:5f:19:41:00:b2:66:a1:70:
         02:20:61:04:70:e5:a6:fc:1b:c7:69:68:e7:09:6b:c7:2c:dd:
         82:8c:be:32:03:91:5d:2a:2f:fb:c5:16:28:c3:ea:40
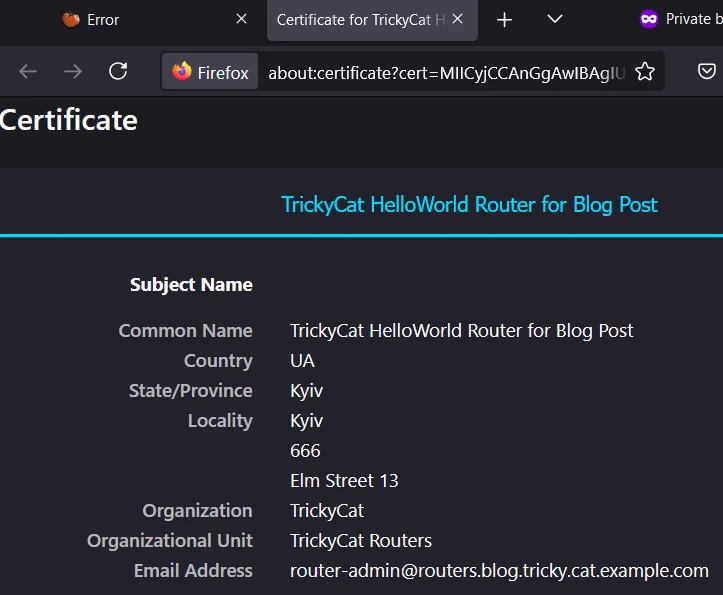
2) Create Certificate
openssl ecparam -genkey -name prime256v1 -out server.key

cat > server.config <<EOF
[req]
distinguished_name = req_distinguished_name
prompt = no

[req_distinguished_name]
commonName = TrickyCat HelloWorld Router for Blog Post
countryName = UA
stateOrProvinceName = Kyiv
localityName = Kyiv
postalCode = 666
streetAddress = Elm Street 13
organizationName = TrickyCat
organizationalUnitName = TrickyCat Routers
emailAddress = router-admin@routers.blog.tricky.cat.example.com
EOF

openssl req -new -SHA256 -key server.key -config server.config -nodes -out server.csr -verbose

cat > server.v3_ext <<EOF
basicConstraints=CA:FALSE
keyUsage = digitalSignature, nonRepudiation, keyEncipherment, dataEncipherment
subjectAltName = @alt_names
extendedKeyUsage = serverAuth

[alt_names]
IP.1 = 192.168.1.1
DNS.1 = 192.168.1.1
DNS.2 = helloworld
DNS.3 = HelloWorld
EOF

openssl x509 -req -SHA256 -extfile server.v3_ext -days 11000 -in server.csr -CA ca.crt -CAkey ca.key -CAcreateserial -out server.crt
View the csr & cert:
# openssl req -text -noout -verify -in server.csr
openssl x509 -noout -text -in server.crt
Certificate:
    Data:
        Version: 3 (0x2)
        Serial Number:
            2b:a6:a1:e4:5b:a7:b7:47:17:89:f1:44:96:27:e7:df:ab:88:7b:c8
        Signature Algorithm: ecdsa-with-SHA256
        Issuer: C = UA, ST = Kyiv, L = Kyiv, O = TrickyCat, CN = TrickyCat Router CA for Blog Post
        Validity
            Not Before: Jul 22 11:02:07 2024 GMT
            Not After : Sep  3 11:02:07 2054 GMT
        Subject: CN = TrickyCat HelloWorld Router for Blog Post, C = UA, ST = Kyiv, L = Kyiv, postalCode = 666, street = Elm Street 13, O = TrickyCat, OU = TrickyCat Routers, emailAddress = router-admin@routers.blog.tricky.cat.example.com
        Subject Public Key Info:
            Public Key Algorithm: id-ecPublicKey
                Public-Key: (256 bit)
                pub:
                    04:ee:d1:0f:03:32:9f:cb:0a:4c:cd:ba:c6:f8:b7:
                    cd:fd:bf:05:70:a8:cd:fe:f7:ce:a3:5d:0a:bf:60:
                    5b:ec:46:34:01:32:0f:bd:4f:00:c2:e3:dc:f5:eb:
                    32:cf:40:ea:c9:89:d5:e6:48:11:57:16:19:14:87:
                    d3:91:96:2a:de
                ASN1 OID: prime256v1
                NIST CURVE: P-256
        X509v3 extensions:
            X509v3 Basic Constraints:
                CA:FALSE
            X509v3 Key Usage:
                Digital Signature, Non Repudiation, Key Encipherment, Data Encipherment
            X509v3 Subject Alternative Name:
                IP Address:192.168.1.1, DNS:192.168.1.1, DNS:helloworld, DNS:HelloWorld
            X509v3 Extended Key Usage:
                TLS Web Server Authentication
    Signature Algorithm: ecdsa-with-SHA256
         30:45:02:21:00:94:4c:8c:a5:a3:4d:d2:e0:59:19:26:2a:40:
         61:28:35:5b:ee:e4:0c:3c:2f:3e:0a:7b:53:04:9e:d2:4b:a8:
         99:02:20:0a:5a:d7:cc:f1:f5:ee:94:2e:87:3d:33:1a:56:3b:
         77:81:d8:1c:3e:7e:9c:04:2d:15:66:dd:2f:54:97:94:90
3) Configure Admin Access on the Router
3.1) Enable HTTPS Access
Ensure that HTTPS admin access is enabled (for now leave HTTP as a fallback too):
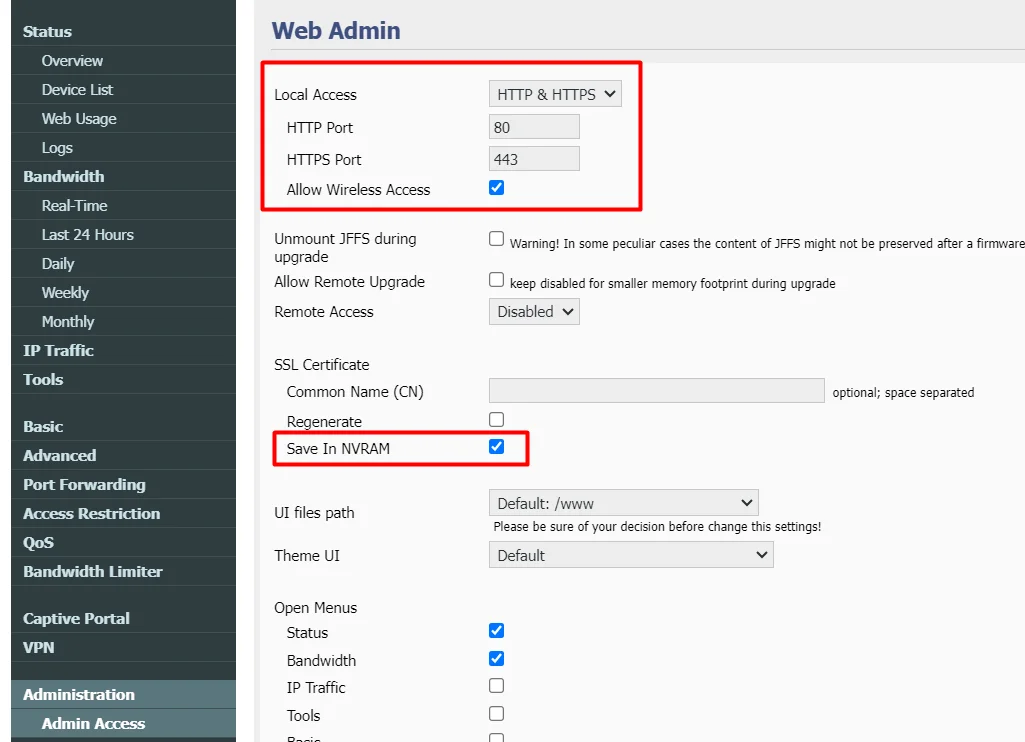
![]() And be sure to select the
And be sure to select the Save In NVRAM option.
![]() Note: The
Note: The Regenerate option must NOT be enabled or the router will regenerate the certificate.
3.2) Enable SSH Connections
Enable SSH on the router’s web UI and connect to it via the key (as I did) or password.

4) Log In via SSH and Do Preparations
-
log into the router
ssh -i "my_router_ssh_key_file" root@192.168.1.1 -
create some temporary folder and inside that folder create a folder named
etce.g.: create a folder
/tmp/trickycat/etcmkdir -p /tmp/trickycat/etc
5) Upload the Certificate
Upload the generated certificate and private key (e.g. server.crt and server.key from above) from your host machine to the router’s temporary etc folder created above.
The names of target files matter here! They must be cert.pem and key.pem
E.g.:
-
server.crt=>cert.pem -
server.key=>key.pem
scp -i "my_router_ssh_key_file" server.crt root@192.168.1.1:/tmp/trickycat/etc/cert.pem
scp -i "my_router_ssh_key_file" server.key root@192.168.1.1:/tmp/trickycat/etc/key.pem
P.S. Or we could generate the CA and certificate on the router, and then copy the CA/cert from the router back to our host machine.
6) Switch Back to Router SSH Session
Configure The Cert Payload
Go back to our temporary folder:
cd /tmp/trickycat
Verify the structure and permissions:
ls -laR
.:
drwxr-xr-x    3 root     root            60 Jul 22 09:19 .
drwxrwxrwx    9 root     root           280 Jul 22 09:19 ..
drwxr-xr-x    2 root     root            80 Jul 22 09:20 etc

./etc:
drwxr-xr-x    2 root     root            80 Jul 22 09:20 .
drwxr-xr-x    3 root     root            60 Jul 22 09:19 ..
-rw-r--r--    1 root     root           964 Jul 22 09:20 cert.pem
-rw-r--r--    1 root     root           302 Jul 22 09:20 key.pem
Create a GZip-ed archive from the etc directory:
tar czf cert.tar.gz etc/
“Upload” the created archive to NVRAM (to a variable named https_crt_file) as a base64-encoded value:
nvram setfb64 https_crt_file cert.tar.gz
Commit the changes in NVRAM to make them persistent:
nvram commit
Reboot the router:
reboot
After the boot, reconnect back to the router via SSH and validate:
# Check the contents of NVRAM:

mkdir /tmp/check
cd /tmp/check

# Save the contents of the NVRAM variable into a file (after base64 decoding)
nvram getfb64 https_crt_file mytest.tgz

# Test the archive
tar tvzf mytest.tgz

# Extract the archive content
# This would create (in the current folder) a directory named `etc`
# with two files:
# - etc/cert.pem
# - etc/key.pem
tar xvzf mytest.tgz

# Check the certificate extracted from the archive
openssl x509 -noout -text -in ./etc/cert.pem

#########################################################

# Check the certificate being used by the web server on the router:
openssl x509 -noout -text -in /etc/cert.pem
7) Earn Trust
Let’s go to web UI:
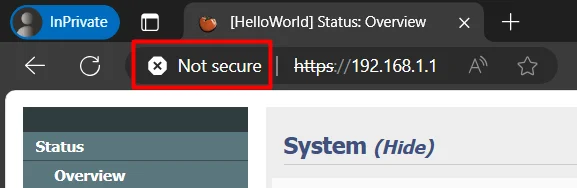
So, the web server served our custom certificate without a problem. But the cert is still not trusted.
To overcome this, let’s add our custom CA certificate to the trusted store on a machine.
For Windows, this would be the following:
-
open the certificate manager for the current machine
-
open the Windows menu
-
type/search for
certificate -
open the “Manage computer certificates” search result

-
-
go to the
Trusted Root Certification Authorities/Certificatesfolder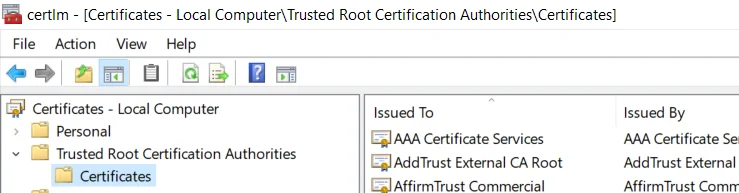
-
right click on the free area in the list of CAs and open
All Tasks -> Import...or follow the main menuAction -> All Tasks -> Import... -
this opens the
Certificate Import Wizard -
follow the wizard and import our custom-generated CA certificate (that we used to sign the router’s cert)

-
after the import, better reopen the browser (since it may cache the certificate info and this caching survives even the hard reload of pages, at least that’s the experience I have with the Chrome browser) or reboot the machine
-
next, go to the router’s HTTPS admin page and proudly see that it’s now recognized as secure and trusted
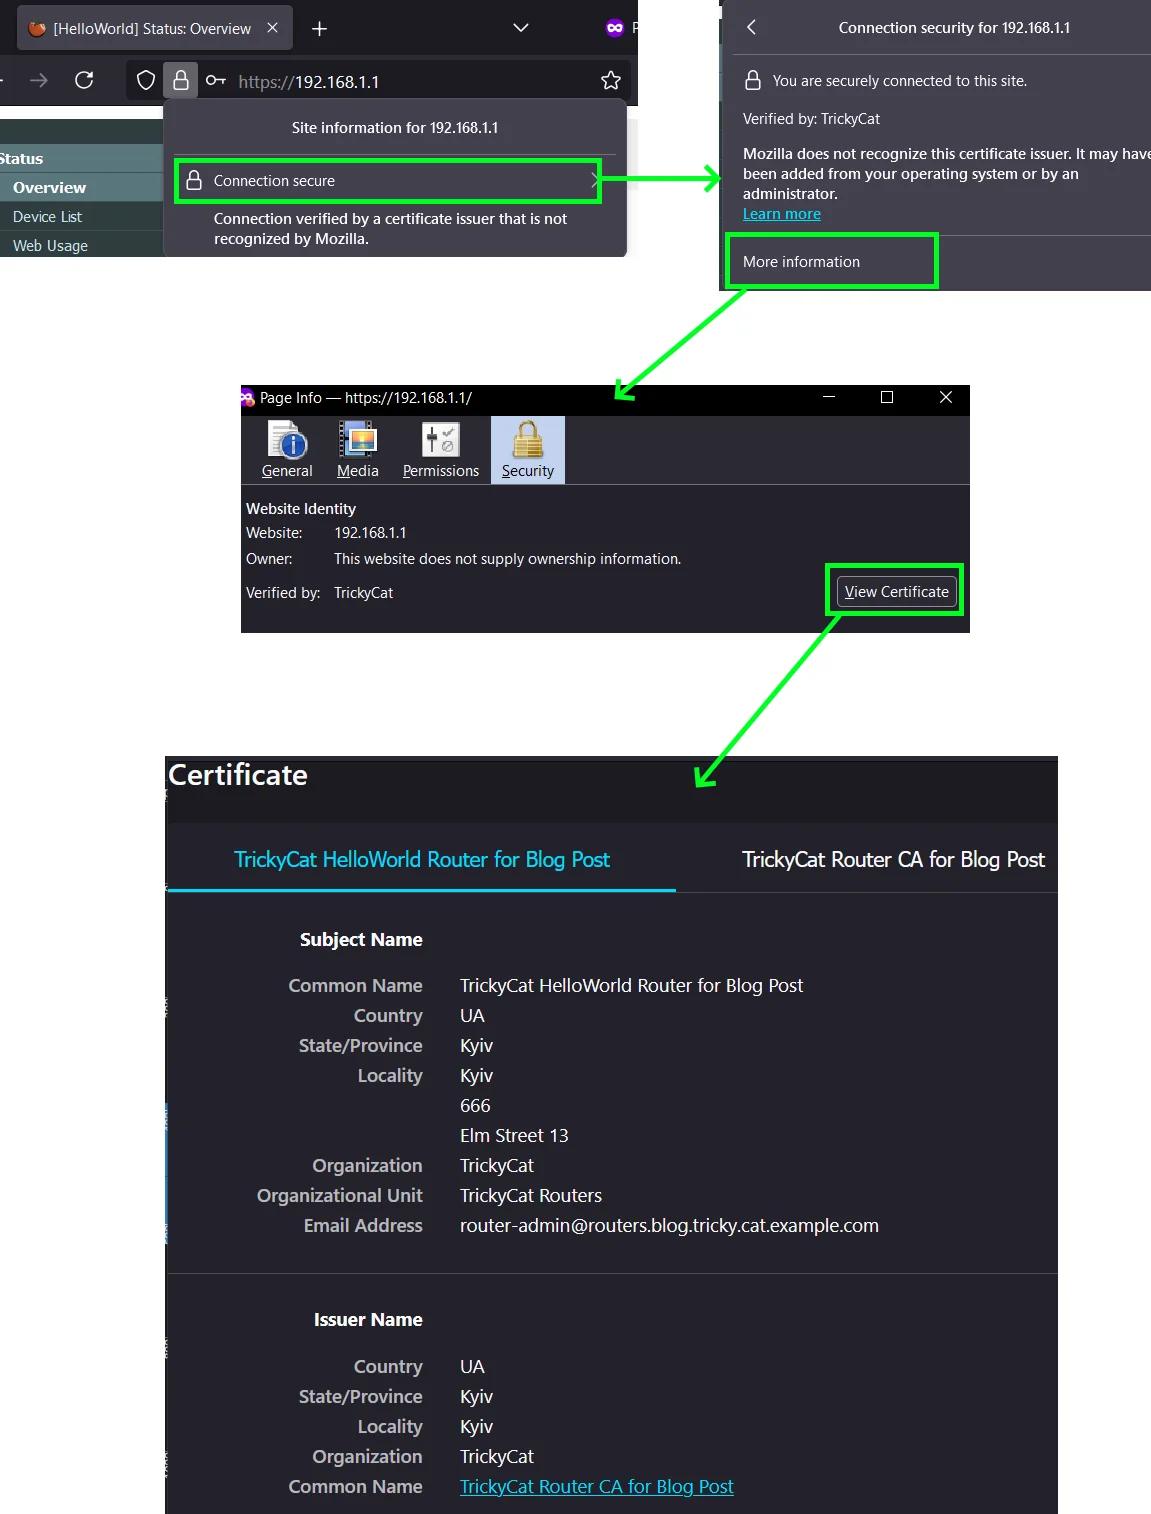
Voila!
![]()